Using Google Analytics for Conversion
Using Google Analytics is a great way to track your business statistics. With it, you can track and measure things like marketing campaigns, site functionality, page views, visit lengths, and more. You can compare data in real-time. You can see where your traffic is coming from, such as organic or paid search, social media, etc.
Most importantly, though, is the fact that you can use Google Analytics to measure conversion. By tracking conversion, you’re able to measure progress within your business and hopefully identify areas of needed improvement that will propel your business (and sales) forward.
Google Analytics is easy, free, and pretty much fool-proof.
Integrating Google Analytics and Your Website
Here’s a breakdown on how to integrate Google Analytics into your website. To be safe, it’s a great idea to backup your site before inputting codes.
WordPress
1. Go to analytics.google.com and sign up.
2. Input your website and general information.
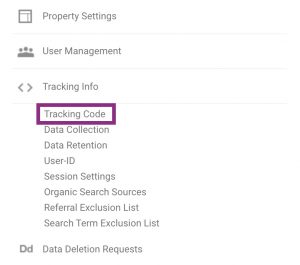
3. To locate the tracking code, click on: Website you wish to track > Website Data > Admin > Tracking Info > Tracking Code.
4. Copy the code in the Global Site Tag box.

5. On WordPress, navigate to Appearance > Editor > Theme Header (header.php).
6. Paste the tracking code before the closing header (</head>).
7. Click Save or Update.
Squarespace
1. Go to analytics.google.com and sign up.
2. Input your website and general information.
3. Go to Admin > Property > Tracking Info.
4. Copy the Tracking ID.

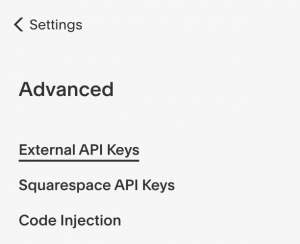
5. In Squarespace, go to Settings > Advanced > External API Keys.
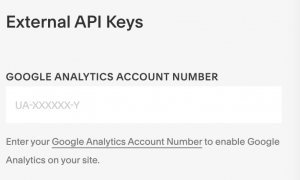
6. Paste your User ID into the Google Analytics Account Number box.
7. Click save.
Integrating Google Analytics and E-Commerce
So you’ve added your tracking link to your website. Great! Now, you’ll want to add tracking to your E-Commerce store. To do so on WordPress, directions vary based on which platform or plugin you’re using. Here are guides for the most popular E-Commerce programs:
WooCommerce
Shopify
BigCommerce
Magento
If you operate through Squarespace and added your Google Analytics Tracking ID to the External API Key section, you should already be good to go.
Customizing Your Dashboard
Once you’ve got your tracking set up, it’s a great idea to customize your Google Analytics experience. You can choose what you wish to see on your Dashboard so that the information being presented aligns with your goals.
To start, navigate to the Home screen of Google Analytics.
1. Go to Customization > Dashboards > Create.
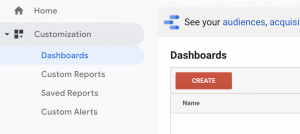
2. Choose from a blank canvas or use a pre-built option.
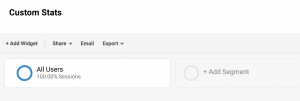
3. Add widgets and stats as desired.
4. To reorganize widgets, hover over the boxes until the Move tool appears. Then, you can drag and drop as you wish.
Setting Up Conversion Monitoring
Finally, let’s go over how to use Google Analytics to monitor your website conversion. Arguably the most important aspect of the platform, the ability to measure conversion is going to be key to your business’s growth. You’ll want to use this feature to set goals, compare data, and measure progress.
1. Log into Google Analytics and select Admin.
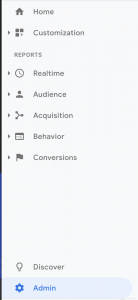
2. In the far right column, select Goals.
3. Select New Goal, and choose whether you’d like to use a Template or create a custom goal.
Measuring “Micro” or “Pre” Conversions
When someone comes on your site, there is typically something that they do before they choose to make a purchase. This may be browsing your website, watching videos, viewing photo galleries, or downloading freebies. Depending on your product offering, the specifics will vary. What each business has in common, though, is that no matter the task or visitor goal, this step should be tracked.
To track this, follow these steps:
1. Set up goals for as many or few things as you’d like. Nothing is too small. Basically, you’ll want to set a goal for each point of conversion, whether it’s staying on a page for 30 seconds or completing a purchase.
2. Complete all fields, including the category (what you’re tracking), the action (the thing people will do, such as watching, sharing, or downloading), and the label (whatever you’re tracking, such as time spent on a page or number of downloads).
Measuring “Macro” Conversions
Once you’ve created pre-conversion goals, it’s time to move onto the macro conversion goals. These are going to be your “ultimate” goals, such as making a sale or having visitors complete a certain action. Since you already have a micro goal set up, you’ll be able to measure how well your entire funnel is performing.
- To measure a macro goal, use the URL that your visitors land on after completing xyz. For example, if your macro goal is to have visitors download something, use the URL of the page or “Thank You” screen that the visitor sees after completing the action. This will only be seen by those that complete the CTA, so the page views will tell you how well the CTA is performing.
- Enter the required information.
- Click Verify.
Ta-da! That’s it! Your goals should be all set up and conversion should be ready to be tracked. When there is enough information to measure, you should be able to go to Conversions > Goals > Overview to check your progress.
Setting up an analytics account can be tricky. However, when done right, it’s incredibly worth the hassle! Being able to measure your conversion rate and monitor progress is an invaluable tool. It can truly help in propelling your business forward.
Hopefully this has been helpful in showing you how to set up your Google Analytics account. Happy measuring!
Sarah

Ready to grow your E-Commerce business?
Here are 3 options to start and scale your E-Commerce Brand with Sarah The E-Commerce Business Coach:
1.The E-Commerce Women In Business Mastermind – Your E-Commerce Membership Community with hands-on support. Work with my dream team to start and scale your online store.
2. VIP 1:1 E-Commerce Coaching – My Blue Ribbon and Private 1:1 E-Commerce coaching for established brands looking for next level growth and support.
3. Facebook Ads for E-Commerce Stores. Learn how to manage your own ads or employ our Facebook Ad Strategist to scale your brand.